In this how-to I'll be walking through the process of creating a contact form in SvelteKit using Airtable for storing the submissions with no additional dependencies.
I got the inspiration for doing this when a saw a video on YouTube from WebJeda on SvelteKit Contact Form using Google Forms. Sharath's video is great but I'm not a fan of using Google products so thought I'd try the same approach with Airtable.
So, time for the standard preamble of the reasoning behind why a contact form on your site is a good thing; Having a contact form on your site is a great way to get people to get in touch with you whilst on your site (great explanation! Right? 😂). I'm not opposed to adding my email address to my website but some people prefer to contact you from the context of the site.
Ok, preamble done let's get to the actual content!
Create the project
I'll be doing this from scratch so you can follow along then implement what you need from this example into your own project.
I'll start with creating a new project in SvelteKit.
npm init svelte@next svelte-and-airtable-contact-form-example
I'll select the following options from the CLI:
✔ Which Svelte app template? › Skeleton project
✔ Use TypeScript? … No
✔ Add ESLint for code linting? … No
✔ Add Prettier for code formatting? … Yes
✔ Add Playwright for browser testing? … No
Then I'll follow the rest of the steps from the CLI output:
Next steps:
  1: cd svelte-and-airtable-contact-form-example
  2: npm install (or pnpm install, etc)
  3: git init && git add -A && git commit -m "Initial commit" # (optional)
  4: npm run dev -- --open
I use pnpm so will be using that in the terminal examples, you can use npm or yarn if you prefer. Live your life! 😁
Ok, now I have the project set up I can go about getting the backend set up with Airtable.
Set up Airtable
So, Airtable is like a hosted version of MS Excel, simply put, it's a database with a nice UI. If you don't have an Airtable account you can sign up over on the Airtable website.
I'll scroll to the bottom of the page and there's a '+ Add a workspace' option. CLick that and select 'Create workspace', I'll be prompted to give it a name I'll call it form-submissions, then I can 'Add a base'. Clicking 'Add a base' gives me the following screen:
From here I'll rename the 'Untitled Base' to contact-requests and 'Table 1' to submissions. I can now go through the fields on there and customise each field type by clicking on the small down arrow next to the field name.
In my example I'll add the following fields by renaming them and changing the types with the 'Customize field type' option.
- 'name' as a 'Single line text' field
- 'email' as a 'Email' field
- 'message' as a 'Long text' field
You can add or remove any additional fields you want to store in Airtable, you do you 😊.
Set up Svelte form
For the contact form I'll make a Svelte component, that can be used anywhere in the project so I'm not bound to having it in one place like a (https://mysite.com/contact) route.
I'll create the lib folder and the contact-form.svelte file via the terminal:
# create the directory/folder
mkdir src/lib
# create the Svelte component file
touch src/lib/contact-form.svelte
In the contact form component I'll create a simple form first, I'll share a full example later.
<form>
  <label for="name">
    <span>Name</span>
  </label>
  <input type="text" name="name" aria-label="name" placeholder="Enter your name" required />
  <label for="email">
    <span>Email</span>
  </label>
  <input type="email" name="email" aria-label="email" placeholder="bill@hotmail.com" required />
  <label for="message">
    <span>Message</span>
  </label>
  <textarea name="message" aria-label="name" placeholder="Message" required rows="3" />
  <input type="submit" />
</form>
Now I import the form for use in the project now, as there's only a home page (src/routes/index.svelte) at the moment I'll add it there.
<script>
  import ContactForm from '$lib/contact-form.svelte'
</script>

<h1>Welcome to SvelteKit</h1>
<p>
  Visit <a href="https://kit.svelte.dev">kit.svelte.dev</a> to read the
  documentation
</p>

<ContactForm />
Now that I have the form sorted I'll need to capture the inputs to submit to Airtable.
To capture the form inputs I'll need to create a handleSubmit method in some <script> tags in the src/lib/contact-from.svelte component.
To handle the form data I'll create a new FormData() object and reference it with data.currentTarget. For now I'll console log out the form data to validate.
const handleSubmit = async data => {
  const formData = new FormData(data.currentTarget)

  console.log(formData.get('name'))
  console.log(formData.get('email'))
  console.log(formData.get('message'))
}
On the form I'll need to add in an event handler for on:submit using the handleSubmit method. Currently the default form action will cause a page refresh so along with the handleSubmit method I'll pipe in the Svelte preventDefault modifier.
<form on:submit|preventDefault={handleSubmit}>
Here's what the component looks like now:
<script>
  const handleSubmit = async data => {
    const formData = new FormData(data.currentTarget)

    console.log(formData.get('name'))
    console.log(formData.get('email'))
    console.log(formData.get('message'))
  }
</script>

<form on:submit|preventDefault="{handleSubmit}">
  <label for="name">
    <span>Name</span>
  </label>
  <input
    type="text"
    name="name"
    aria-label="name"
    placeholder="Enter your name"
    required
  />
  <label for="email">
    <span>Email</span>
  </label>
  <input
    type="email"
    name="email"
    aria-label="email"
    placeholder="bill@hotmail.com"
    required
  />
  <label for="message">
    <span>Message</span>
  </label>
  <textarea
    name="message"
    aria-label="name"
    placeholder="Message"
    required
    rows="3"
  />
  <input type="submit" />
</form>
Now, from the homepage I'll be able to add in some form values, click submit and see them logged out in the browser console!
Ok now I have the form ready to submit data to Airtable I'll need to create a SvelteKit endpoint to POST the data to Airtable.
Get Airtable API keys
I'll be POSTing the data to the Airtable REST API, to do this I'm going to need to reference the awesome Airtable documentation!
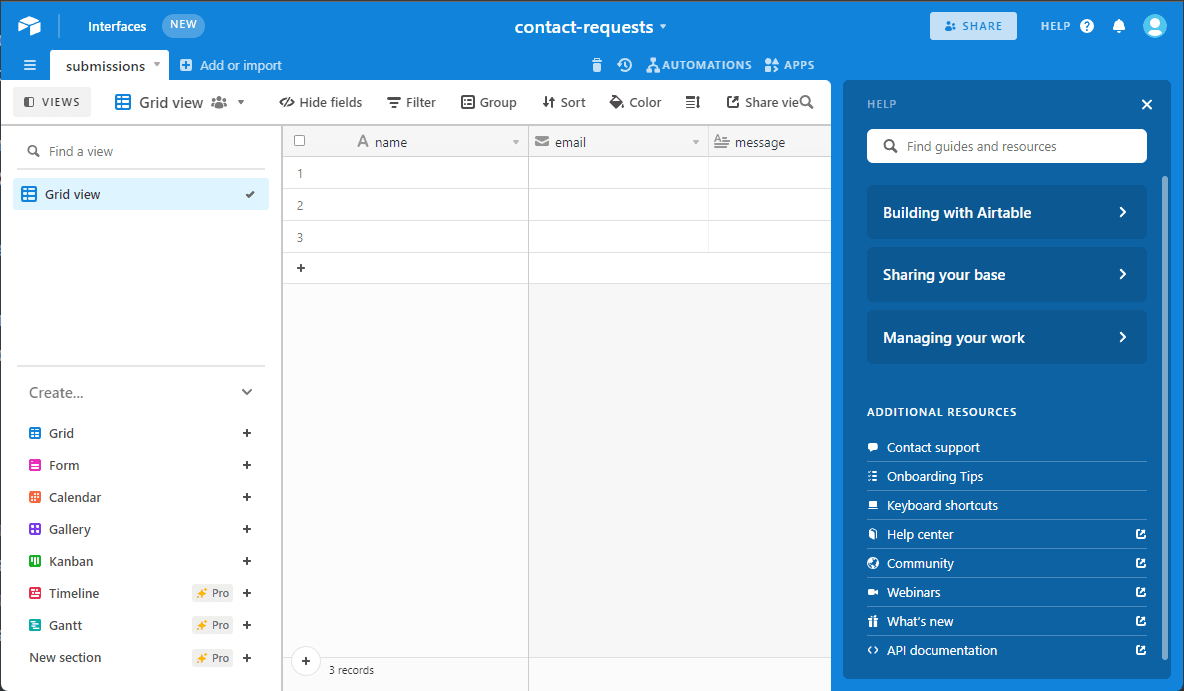
I can access it by clicking the 'HELP ?' link in the top right of the base page. Clicking it will pop out the help panel and at the very bottom of the panel is the '<> API Dcoumentaion' link.
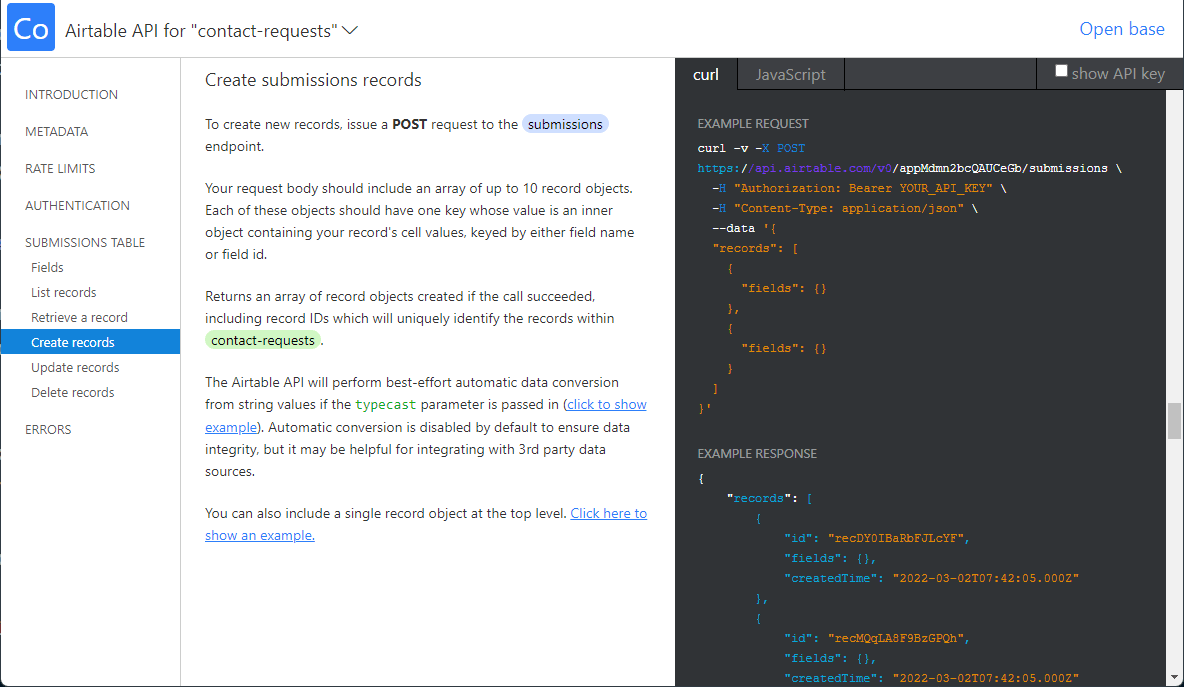
Clicking that will take me to the documentation for that base! What I'm interested in here is the 'Create records' section. I'll scroll down to that on the page.
So at the moment this gives me the workspace ID appMdmn2bcQAUCeGb and has "Authorization: Bearer YOUR_API_KEY" as well. If I click on the 'show API key' in the top right hand corner it will show me the API key "Authorization: Bearer keybJWwl29RhmPEQh". I'll need this for POSTing the form data to Airtable.
Also note the "records" array doesn't give me a great deal of information as there's no data to display from my table.
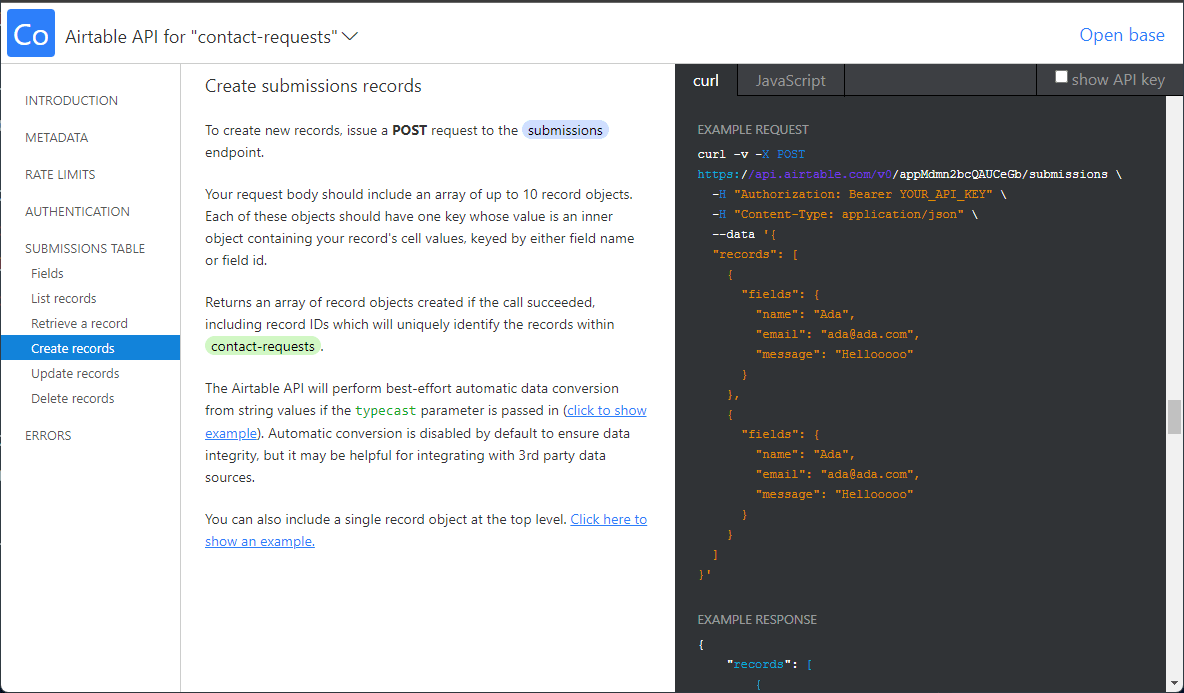
What I'm going to do is go back to the table and add some dummy data first then go back to the API documentation. I'll hop on over to the table and add in some dummy data.
No I can go back to the API documentation page and hit refresh and I'll see the dummy data in the "records" array.
Why am I doing this? This is so I know the shape of the data that the API is expecting!
Now onto creating the endpoint in SvelteKit to submit the data to Airtable.
Set up SvelteKit endpoint
I'm going to create a contact-form folder and a index.json.js to go in there.
I'll do this with the following bash commands:
# create the endpoint folder
mkdir src/routes/contact-form
# create the endpoint index file
touch src/routes/contact-form/index.json.js
In the index.json.js file I'm going to create a post function that will accept a {request} object. The .json.js file notation may look a bit funky, this is letting SvelteKit know the return type of the data (JSON) from the endpoint.
From that request comming into the endpoint I'll be able to get the formData which needs to be submitted from the form to the endpoint!
I'll scaffold out the endpoint first, then go to the form to submit the data to the endpoint, first in src/routes/contact-form/index.json.js I'll add this:
export const post = async ({ request }) => {
  const fd = await request.formData()

  const name = fd.get('name')
  const email = fd.get('email')
  const message = fd.get('message')

  console.log('name:', name)
  console.log('email:', email)
  console.log('message:', message)

  return {
    status: 200,
    body: { message: 'success' },
  }
}
This is so I can log out the details from the submission and confirm they are being received by the endpoint.
Now in the contact form <script> tags I'll add in a request to the contact-form endpoint.
<script>
  const handleSubmit = async data => {
    const formData = new FormData(data.currentTarget)

    const res = await fetch('/contact-form.json', {
      method: 'POST',
      body: formData,
    })

    const { message } = await res.json()

    console.log(message)
  }
</script>
Here I'm making a request to the contact-form endpoint, defining the method as a POST and the body as the formData from the form.
This is to validate the data from the form is being passed to the endpoint, looking at the browser console and my terminal I can see that the formData is being logged out on the endpoint and the success message is being returned to the form!
Environment variables
So I'm not committing my AirTable API keys to the repo, I'm going to create a .env file in the root of the project:
# create the .env file
touch .env
Then I'll add in the base ID (workspace ID) and the authorisation bearer token:
VITE_AIRTABLE_BASE_ID=appMdmn2bcQAUCeGb
VITE_AIRTABLE_TOKEN=keybJWwl29RhmPEQh
These need to be accessed with Vite's import.meta syntax.
POST the data to Airtable
In my endpoint I'll remove the console.log's and replace them with the AIRTABLE_BASE_ID the AIRTABLE_TOKEN and I'll take the AIRTABLE_URL from the AirTable API documentation and replace the AIRTABLE_BASE_ID in the AIRTABLE_URL with a variable. This can be committed but I prefer to keep anything that can change to a minimum.
const AIRTABLE_BASE_ID = import.meta.env.VITE_AIRTABLE_BASE_ID
const AIRTABLE_TOKEN = import.meta.env.VITE_AIRTABLE_TOKEN
const AIRTABLE_URL = `https://api.airtable.com/v0/${AIRTABLE_BASE_ID}/submissions`
I'll take the shape of the data being expected from the API documentation and add it to a variable:
let data = {
  records: [
    {
      fields: {
        name,
        email,
        message,
      },
    },
  ],
}
The name, email and message variables taken from the fd object can be added directly to the data variable now. This is why I renamed the fields with lowercase characters 😊.
Then I'll create a fetch request to the AIRTABLE_URL endpoint, adding in the AIRTABLE_TOKEN as the Authorization header and specifying the content type as application/json and passing in the data object for the body of the request:
const res = await fetch(AIRTABLE_URL, {
  method: 'POST',
  headers: {
    Authorization: `Bearer ${AIRTABLE_TOKEN}`,
    'Content-Type': 'application/json',
  },
  body: JSON.stringify(data),
})
I can now check that the request was successful from the from by checking the res.ok status in an if statement:
if (res.ok) {
  return {
    status: 200,
    body: {
      message: 'success',
    },
  }
} else {
  return {
    status: 404,
    body: {
      message: 'failed',
    },
  }
}
If you're not into code walls then scroll on! I'll share the source for all of this at the end of this post.
Anyway, if you're interested, here's what the full src/routes/contact-form/index.json.js file looks like now:
export const post = async ({ request }) => {
  const fd = await request.formData()

  const name = fd.get('name')
  const email = fd.get('email')
  const message = fd.get('message')

  const AIRTABLE_BASE_ID = import.meta.env.VITE_AIRTABLE_BASE_ID
  const AIRTABLE_TOKEN = import.meta.env.VITE_AIRTABLE_TOKEN
  const AIRTABLE_URL = `https://api.airtable.com/v0/${AIRTABLE_BASE_ID}/submissions`

  let data = {
    records: [
      {
        fields: {
          name,
          email,
          message,
        },
      },
    ],
  }
  const res = await fetch(AIRTABLE_URL, {
    method: 'POST',
    headers: {
      Authorization: `Bearer ${AIRTABLE_TOKEN}`,
      'Content-Type': 'application/json',
    },
    body: JSON.stringify(data),
  })

  if (res.ok) {
    return {
      status: 200,
      body: {
        message: 'success',
      },
    }
  } else {
    return {
      status: 404,
      body: {
        message: 'failed',
      },
    }
  }
}
Sweet! So, I'll test this out now by adding in some form data to the form and clicking the submit button!
Now if I go over to the AirTable submissions table I can see that the form data I added is here! AWESOME!
Managing form state
So I've submitted the data to the Airtable API, now I need to manage the form state, as it is at the moment the form data is still there after I click the submit button.
I can use the message I get back from the endpoint to control the form. So I'll create a variable for the endpoint status.
I'll create a submissionStatus variable to control the form state outside of the handleSubmit function, then inside of the handleSubmit function I'll set the submissionStatus to submitting then I know that the POST has started.
In the form I can use the Svelte if expression for the various messages that can be returned from the endpoint.
{#if submissionStatus === 'submitting'}
  <p>Submitting...</p>
{:else if submissionStatus === 'failed'}
  <p>Submission failed.</p>
{:else if submissionStatus === 'success'}
  <p>Submission success.</p>
{:else}
  <!-- form goes here! -->
{/if}
Another code wall warning! Here's the full src/routes/contact-form/index.svelte file:
<script>
  let submissionStatus = ''
  const handleSubmit = async data => {
    submissionStatus = 'submitting'
    const formData = new FormData(data.currentTarget)

    const res = await fetch('/contact-form.json', {
      method: 'POST',
      body: formData,
    })

    const { message } = await res.json()
    submissionStatus = message
  }
</script>

{#if submissionStatus === 'submitting'}
  <p>Submitting...</p>
{:else if submissionStatus === 'failed'}
  <p>Submission failed.</p>
{:else if submissionStatus === 'success'}
  <p>Submission success.</p>
{:else}
  <form on:submit|preventDefault={handleSubmit}>
    <label for="name">
      <span>Name</span>
    </label>
    <input
      type="text"
      name="name"
      aria-label="name"
      placeholder="Enter your name"
      required
    />
    <label for="email">
      <span>Email</span>
    </label>
    <input
      type="email"
      name="email"
      aria-label="email"
      placeholder="bill@hotmail.com"
      required
    />
    <label for="message">
      <span>Message</span>
    </label>
    <textarea
      name="message"
      aria-label="name"
      placeholder="Message"
      required
      rows="3"
    />
    <input type="submit" />
  </form>
{/if}
Now I can control the form state from the submissionStatus variable and give a useful message back to the user on the status of the submission!
Awesome, right?
But wait! There's more!
Automation
So, let's think about this now; I now have another thing I need to keep tabs on for message submissions, right?
WRONG! Airtable has an awesome integrations feature that you can do loads of things with.
For this example though all I need really is to be notified when there's a new submission.
So, I'll set that up now!
Back on over on the Airtable workspace much like where the help panel link was there's also a link for 'Automations' in the top right.
Clicking on that will pop out the automations panel, on that I'll select the 'Create a custom automation' link.
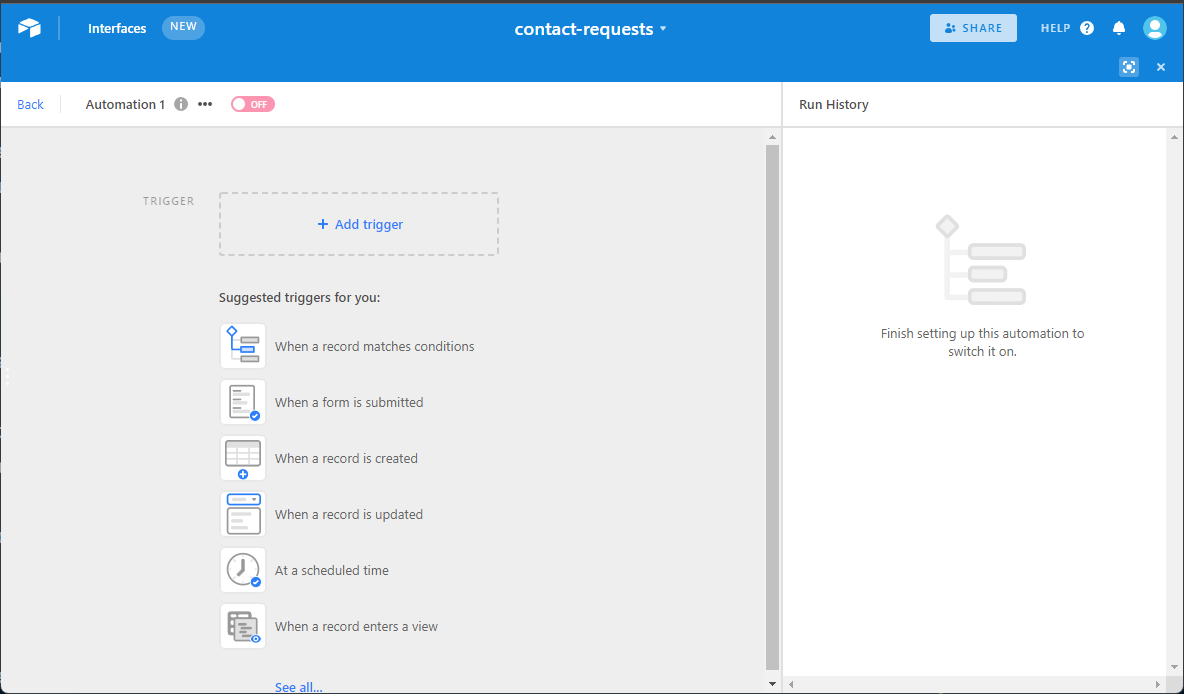
That opens the automation flow.
In here I can change the automation name by clicking on it to something like submission-email-automation, note the default state is off.
From hereI can add a trigger by clicking '+ Add trigger' and selecting 'When record is created'. The 'Run actions' panel then appears and I can select '+ Add action' and select 'Send email'.
I'll select the 'Send email' option.
You may have noticed the exclamation mark next to 'When a record is created'. If I hover the mouse over it, it will expand to say 'Fix configuration'. Clicking that pops open a configuration option in the side panel to select the table. I'll pick the submissions table.
Then there'll be an exclamation next to the 'Send an email' option. Hovering over that with the mouse gives the same 'Fix configuration' message. Clicking that will open the configuration panel for email!
In that panel I can add in the email address I want the submission sent to along with the subject line.
If I scroll down a little there's an option for the message, by clicking the blue + button I can add in the message.
There's one option to 'Record (from Step 1: When a record is created), clicking on 'Continue' will bring up the available properties. I'm going to select to inset name, email, and message.
Next I can scroll down to the 'Testing' section, expand that and select 'Test action'. I'll select to 'Run tests' and wait for the result.
I get a successful result, so, now I can change the state of the automation to 'On' and I'm done!
Now anytime a submission is made I'll get an email sent to my inbox!
Conclusion
I've gone and created a simple form that will collect data from the user of the site that will then post that data to an endpoint. When someone submits a message via the form I'll receive an email so I can action it without having to keep checking on the Airtable table.
You can check out the demo project and code for this post with some minimal styles added over on GitHub.
If you found this post useful, consider sharing it on Twitter with the button, thanks!
